Trong bài viết này, mình sẽ hướng dẫn các bạn tích hợp Swagger UI vào project ASP.NET Core 2.1
 Cài đặt thư viện IdentityServer 4:
 Khi compile, bạn sẽ gặp rất nhiều lỗi Missing XML, vd như:
Content-type: application/x-www-form-urlencoded
RequestBody:
client_id= IdentityServer4Demo &client_secret=superSecretPassword&grant_type=password&username=your-username&password=your-password&scope=customAPI.read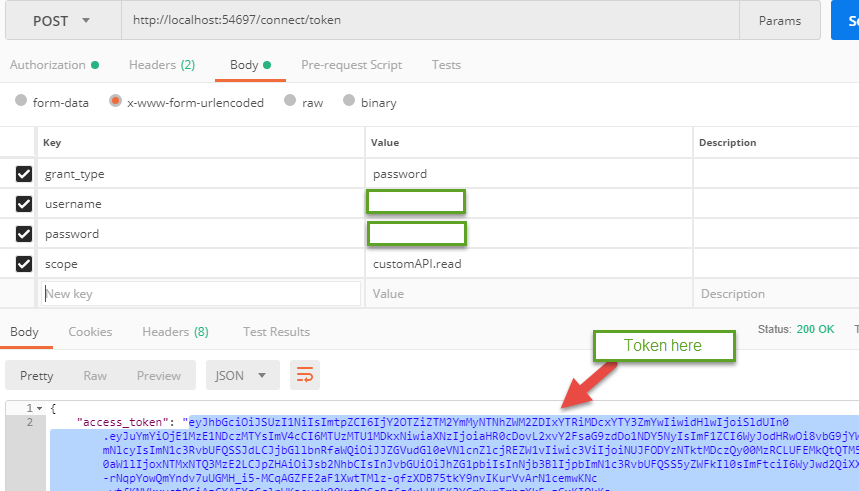
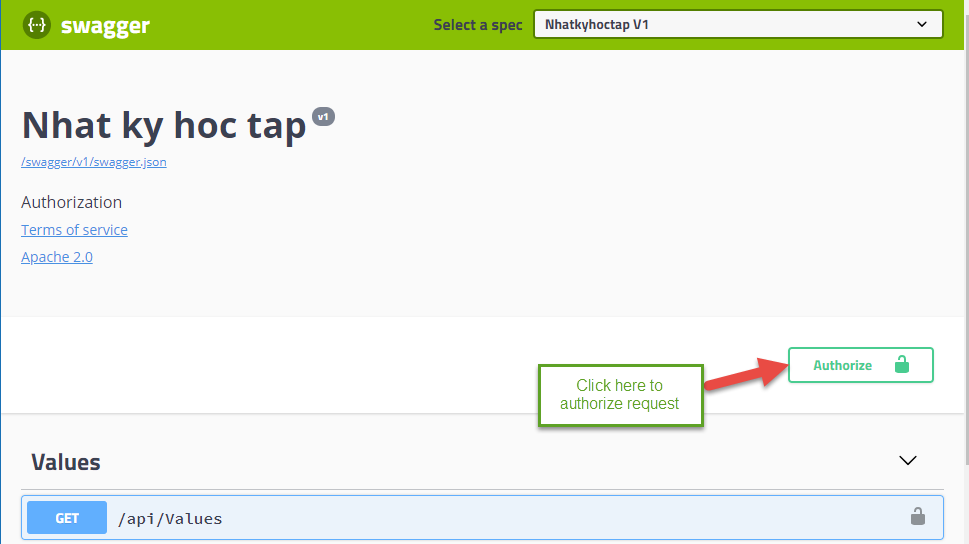
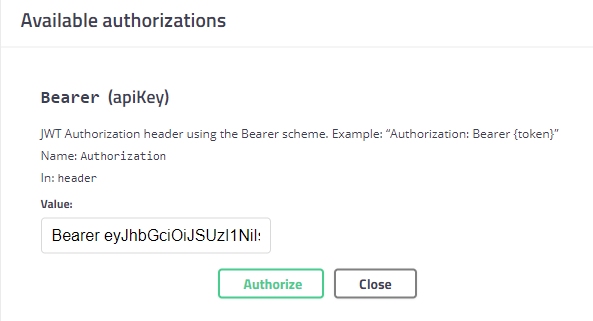
Bạn sẽ thấy nút Authorize ở góc phải. Click vào để thêm token
 Thêm token theo format: Bearer <your token>. Sau đó bấm nút Authorize
Thực hiện request lấy values từ ValuesController, token sẽ được tự động thêm vào mỗi khi thực hiện request.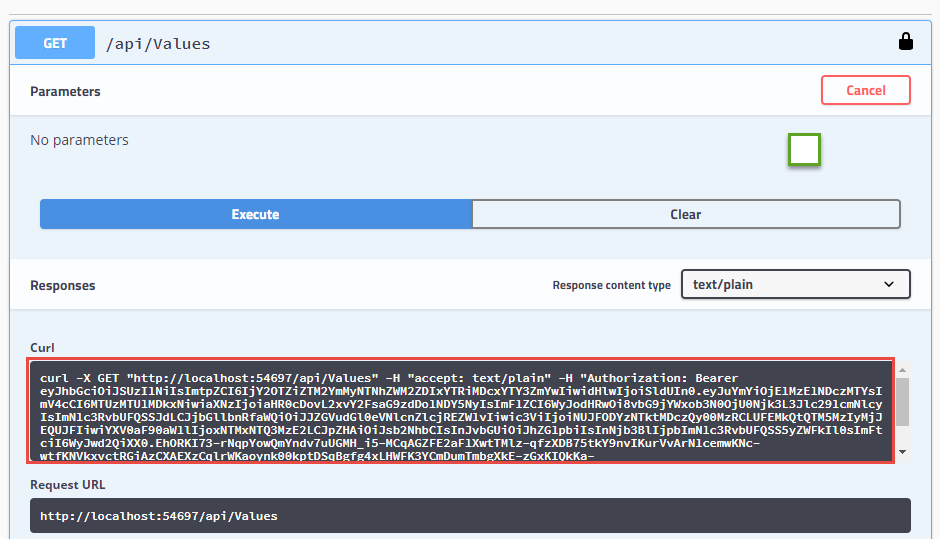 Và như vậy, mỗi request sẽ đính kèm token dùng để authorize.
http://michaco.net/blog/TipsForUsingSwaggerAndAutorestInAspNetCoreMvcServices
https://ppolyzos.com/2017/10/30/add-jwt-bearer-authorization-to-swagger-and-asp-net-core/
Chúc các bạn thành công.
Swagger UI là gì?
Swagger UI là tập hợp các file HTML, Javascrpt, và CSS để tự động tạo tài liệu từ API tương thích với Swagger. Các bạn có thể tham khảo them Swagger từ địa chỉ: https://swagger.ioSetup Swagger UI trong ASP.NET Core
Bài viết này chỉ tập trung về Swagger UI, nên sẽ đi qua nhanh phần setup token sử dụng IdentityServer 4. Mọi người có thể tìm hiểu thêm về IdentityServer 4 ở link sau: https://nhatkyhoctap.blogspot.com/2017/08/tim-hieu-ve-identityserver-4.htmlSetup IdentityServer 4
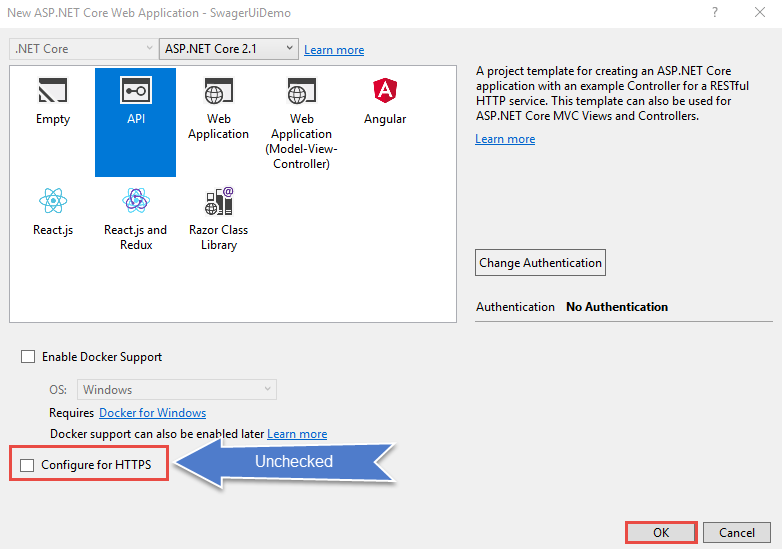
Tạo Project ASP.NET Core Web API
Cài đặt thư viện IdentityServer 4:
Install-Package IdentityServer4 -Version 2.2.0
Install-Package IdentityServer4.AccessTokenValidation -Version 2.6.0
public class Clients
{
 public static IEnumerable<Client> Get()
 {
  return new List {
     new Client {
    ClientId = "IdentityServer4Demo",
    ClientName = "Example Client Credentials Client Application",
    AllowedGrantTypes = GrantTypes.ResourceOwnerPassword,
    ClientSecrets = new List {
     new Secret("superSecretPassword".Sha256())},
    AllowedScopes = new List {"customAPI.read"}
      }
   };
 }
}

public class Resources
{
 public static IEnumerable<IdentityResource> GetIdentityResources()
 {
  return new List {
   new IdentityResources.OpenId(),
   new IdentityResources.Profile(),
   new IdentityResources.Email(),
   new IdentityResource {
    Name = "role",
    UserClaims = new List {"role"}
   }
  };
 }

 public static IEnumerable<ApiResource> GetApiResources()
 {
  return new List {
   new ApiResource {
    Name = "customAPI",
    DisplayName = "Custom API",
    Description = "Custom API Access",
    UserClaims = new List {"role"},
    ApiSecrets = new List {new Secret("scopeSecret".Sha256())},
    Scopes = new List {
     new Scope("customAPI.read"),
     new Scope("customAPI.write")
    }
   }
  };
 }
}

public class Users
{
 public static List<TestUser> Get()
 {
  return new List {
     new TestUser {
    SubjectId = "5BE86359-073C-434B-AD2D-A3932222DABE",
    Username = "your-username",
    Password = "your-password",
    Claims = new List {
     new Claim(JwtClaimTypes.Email, youremail@gmail.com"),
     new Claim(JwtClaimTypes.Role, "admin")
    }
     }
  };
 }
}
JwtSecurityTokenHandler.DefaultInboundClaimTypeMap.Clear();
 services.AddIdentityServer()
   .AddInMemoryClients(Clients.Get())
   .AddInMemoryIdentityResources(Models.IdentityServerModel.Resources.GetIdentityResources())
   .AddInMemoryApiResources(Models.IdentityServerModel.Resources.GetApiResources())
   .AddTestUsers(Users.Get())
   .AddDeveloperSigningCredential();
 services.AddAuthentication(options =>
 {
  options.DefaultAuthenticateScheme =
   JwtBearerDefaults.AuthenticationScheme;
  options.DefaultChallengeScheme =
   JwtBearerDefaults.AuthenticationScheme;
 }).AddIdentityServerAuthentication(x =>
 {
  x.Authority = "http://your-website-url/";
  x.ApiName = "customAPI";
  x.RequireHttpsMetadata = false;
 });
app.UseIdentityServer();
app.UseAuthentication();
Setup Swagger UI in ASP.NET Core
Thêm attribute Authorize vào class ValuesController.
[Route("api/[controller]")]
[ApiController]
[Authorize]
public class ValuesController : ControllerBase
{
 // code was removed
}
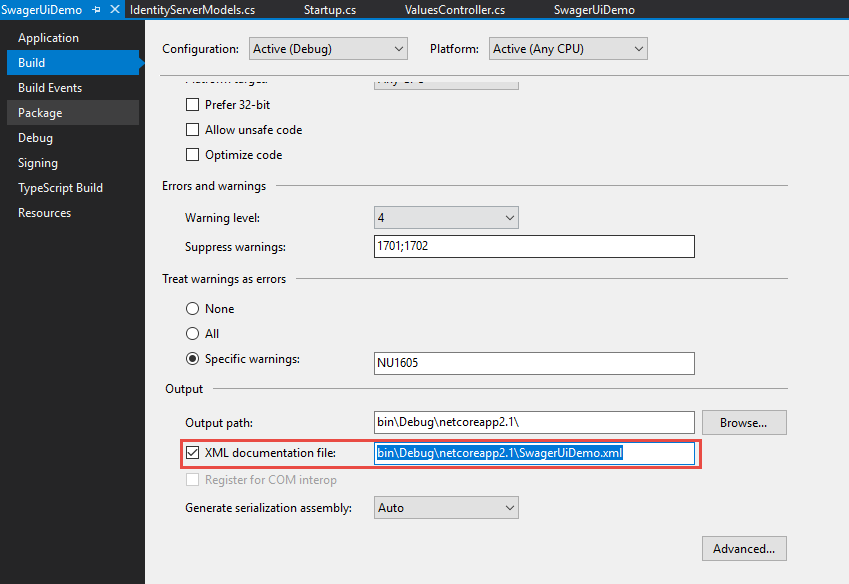
Install-Package Swashbuckle.Aspnetcore1>Controllers\ValuesController.cs(11,18,11,34): warning CS1591: Missing XML comment for publicly visible type or member 'ValuesController'Để khắc phục, bạn edit Project SwaggerUiDemo, thêm dòng này vào trong cặp thẻ PropertyGroup
<NoWarn>$(NoWarn);1591</NoWarn>
services.AddSwaggerGen(c =>
{
 c.SwaggerDoc("v1", new Info
 {
  Title = "Blog Engine",
  Version = "v1",
  Description = "Authorization",
  License = new License
  {
   Name = "Apache 2.0",
   Url = "http://www.apache.org/licenses/LICENSE-2.0.html"
  },
  TermsOfService = "None"
 });
 // Set the comments path for the Swagger JSON and UI.
 var xmlFile = $"{Assembly.GetExecutingAssembly().GetName().Name}.xml";
 var xmlPath = Path.Combine(AppContext.BaseDirectory, xmlFile);
 c.IncludeXmlComments(xmlPath);

 // Swagger 2.+ support
 var security = new Dictionary<string, IEnumerable<string>>
 {
  {"Bearer", new string[] { }},
 };


 c.AddSecurityDefinition("Bearer", new ApiKeyScheme
 {
  Description = "JWT Authorization header using the Bearer scheme. Example: \"Authorization: Bearer {token}\"",
  Name = "Authorization",
  In = "header",
  Type = "apiKey"
 });
 c.AddSecurityRequirement(security);
});
// Enable middleware to serve generated Swagger as a JSON endpoint.
app.UseSwagger();

// Enable middleware to serve swagger-ui (HTML, JS, CSS, etc.),
// specifying the Swagger JSON endpoint.
app.UseSwaggerUI(c =>
{
 c.SwaggerEndpoint("/swagger/v1/swagger.json", "Nhatkyhoctap V1");
 c.DocExpansion(DocExpansion.List);
});
Content-type: application/x-www-form-urlencoded
RequestBody:
client_id= IdentityServer4Demo &client_secret=superSecretPassword&grant_type=password&username=your-username&password=your-password&scope=customAPI.read
Authorize request trong Swagger UI
Mở Swagger UI: http://your-website-url/swagger/index.htmlBạn sẽ thấy nút Authorize ở góc phải. Click vào để thêm token
Thêm token theo format: Bearer <your token>. Sau đó bấm nút Authorize
Thực hiện request lấy values từ ValuesController, token sẽ được tự động thêm vào mỗi khi thực hiện request.
Và như vậy, mỗi request sẽ đính kèm token dùng để authorize.Tham khảo
https://docs.microsoft.com/en-us/aspnet/core/tutorials/web-api-help-pages-using-swagger?tabs=visual-studiohttp://michaco.net/blog/TipsForUsingSwaggerAndAutorestInAspNetCoreMvcServices
https://ppolyzos.com/2017/10/30/add-jwt-bearer-authorization-to-swagger-and-asp-net-core/
Chúc các bạn thành công.
Nhận xét
Đăng nhận xét