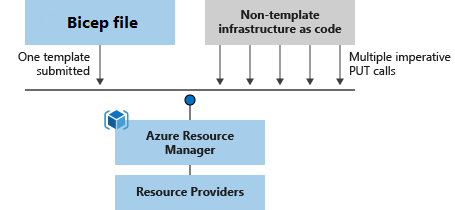
Bicep là gì?
Azure Bicep là một ngôn ngữ triển khai Infrastructure as Code (IaC) dành cho Azure. Được thiết kế để thay thế cho JSON, Bicep giúp đơn giản hóa quá trình viết và duy trì các file mô tả cấu hình hạ tầng Azure. Nó cung cấp cú pháp đơn giản, đọc hiểu dễ dàng và hỗ trợ tính tái sử dụng mã nguồn.
Tại sao phải sử dụng Bicep
Bicep được thiết kế để thay thế cho ngôn ngữ ARM template, giúp giảm độ phức tạp của mã nguồn và cung cấp trải nghiệm phát triển tốt hơn.
Tham khảo thêm https://learn.microsoft.com/en-us/azure/azure-resource-manager/bicep/overview?tabs=bicep#benefits-of-bicep

Cú pháp cơ bản
Azure Bicep cung cấp cú pháp đơn giản và hiệu quả để triển khai cấu hình
hạ tầng trên Azure. Dưới đây là một số điểm quan trọng về cú pháp cơ
bản, bao gồm khai báo biến, sử dụng vòng lặp, và ví dụ minh họa.
var location = 'East US'
var resourceGroupName = 'MyResourceGroup'resource storageAccount 'Microsoft.Storage/storageAccounts@2021-06-01' = [for name in storageAccountNames: {
name: name
location: 'East US'
sku: {
name: 'Standard_LRS'
}
}]var location = 'East US'
var resourceGroupName = 'MyResourceGroup'
param storageAccountNames array = ['storage1', 'storage2', 'storage3']
resource storageAccount 'Microsoft.Storage/storageAccounts@2021-06-01' = [for name in storageAccountNames: {
name: name
location: location
sku: {
name: 'Standard_LRS'
}
}]
output storageAccountIds array = [for account in storageAccount: account.id]Bạn có thể thử thực hành deploy sử dụng Bicep ở link sau: Quickstart: Deploy a container instance in Azure using Bicep
Dưới đây là quickstart nếu bạn muốn sử dụng Bash
Bạn chuẩn bị file main.bicep
Mở Bash Shell trên Azure, gõ lệnh như sau:
az deployment group create \
--resource-group <resource-group-name> \
--template-file <path-to-template-file> \
--parameters name=<container-name>
Bạn thay thế resource-group-name:
<resource-group-name>: tên resource group mà bạn muốn chứa resource
<path-to-template>: đường dẫn tới file json vừa được upload
<container-name>: tên container mà bạn muốn tạo
VD:
az deployment group create \
--resource-group rg_eastus_123456 \
--template-file main.bicep \
--parameters name=abc
Kiểm tra kết quả bằng cách vào View all resource
Ví dụ 2
Trong ví dụ này, chúng ta sẽ tạo Azure Management APIs bằng bicep (tạo file main.bicep)
@description('The name of the API Management service instance')
param apiManagementServiceName string = 'apiservice${uniqueString(resourceGroup().id)}'

@description('The email address of the owner of the service')
@minLength(1)
param publisherEmail string

@description('The name of the owner of the service')
@minLength(1)
param publisherName string

@description('The pricing tier of this API Management service')
@allowed([
  'Consumption' // Update the allowed SKUs to only include 'Consumption'
])
param sku string = 'Consumption' // Set the default SKU to 'Consumption'

@description('The instance size of this API Management service.')
// Set capacity to 0 for Consumption SKU
param skuCount int = sku == 'Consumption' ? 0 : 1

@description('Location for all resources.')
param location string = resourceGroup().location

resource apiManagementService 'Microsoft.ApiManagement/service@2021-08-01' = {
  name: apiManagementServiceName
  location: location
  sku: {
    name: sku
    capacity: skuCount
  }
  properties: {
    publisherEmail: publisherEmail
    publisherName: publisherName
  }
}
Giải thích
@description: cung cấp mô tả cho tham số
uniqueString(resourceGroup().id): tạo ra chuỗi duy nhất dựa trên resource group ID.
resource apiManagementService: Khai báo resource apiManagementService, loại resource: 'Microsoft.ApiManagement/service@2021-08-01' xác định đây là một dịch vụ API Management phiên bản API 2021-08-01.

Nhận xét
Đăng nhận xét